Following Part 2 of the series, the second component to be set up is the Smallstep Certificate Authority server. Smallstep is a lightweight CA I use to issue and manage TLS certificates for my internal services. It makes it easy to automate cert handling without relying on external CAs such as Let’s Encrypt, nor do I have to reveal details about my domain names to the public.
Docker Compose
The Docker Compose file and configuration of Smallstep is located in /containers/smallstep base folder.
/containers/smallstep/docker-compose.yaml
services:
  smallstep-handletec-vps:
    image: smallstep/step-ca:latest
    container_name: smallstep-handletec-vps
    restart: unless-stopped
    env_file: /containers/smallstep/vps.env
    volumes:
      - /containers/smallstep/data:/home/step
    ports:
      - 127.0.0.1:9000:9000/tcp
    healthcheck:
      test:
        - CMD
        - curl
        - -k
        - https://localhost:9000/health
      interval: 60s
      retries: 5
      start_period: 10s
      timeout: 10s
    networks:
        - webproxy

networks:
  webproxy:
    external: true
Create a /containers/smallstep/vps.env environment variable file with the contents
DOCKER_STEPCA_INIT_NAME=Name of the VPS to be displayed in certificates
DOCKER_STEPCA_INIT_DNS_NAMES=localhost,stepca.internal,ca.mydomain.com,ip address this instance is reachable
DOCKER_STEPCA_INIT_REMOTE_MANAGEMENT=true
DOCKER_STEPCA_INIT_PROVISIONER_NAME=homelab
where
| Environment Variable | Description |
|---|---|
DOCKER_STEPCA_INIT_NAME |
Sets the CA’s display name (e.g., “Internal CA”) |
DOCKER_STEPCA_INIT_DNS_NAMES |
Comma-separated DNS SANs for the CA’s TLS certificate |
DOCKER_STEPCA_INIT_REMOTE_MANAGEMENT |
Enables remote management via step CLI (true or false) |
DOCKER_STEPCA_INIT_PROVISIONER_NAME |
Name of the initial provisioner used for issuing certs (e.g., “homelab”) |
For DOCKER_STEPCA_INIT_DNS_NAMES, since we are binding Smallstep to a specific IP, make sure that IP is listed in this environment variable, otherwise when you attempt to connect to this instance, it will give an error.
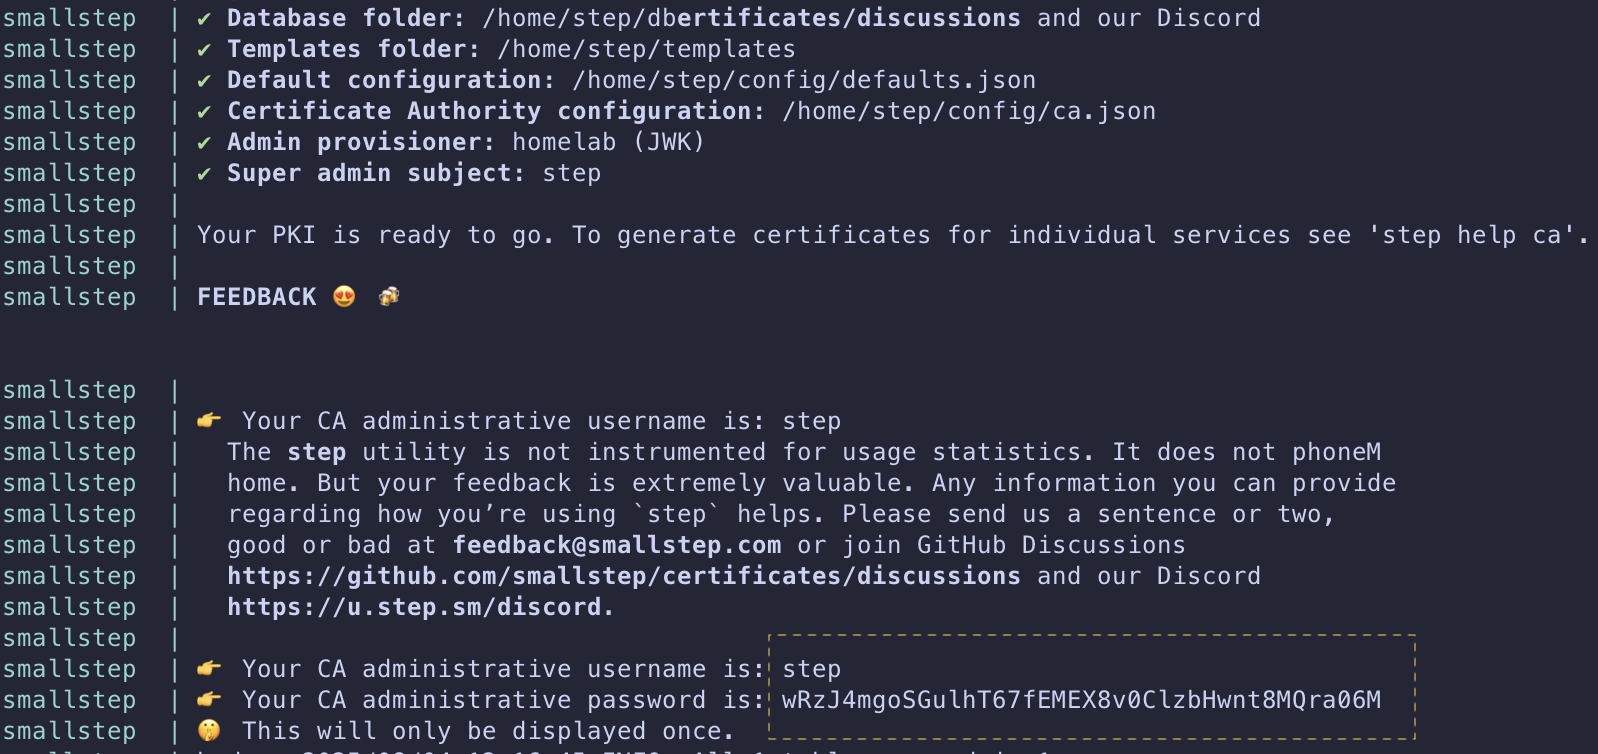
Bring up the container via docker compose up -d and jot down the randomly generated password with the default username step. This will be shown only ONCE and is important when we want to perform administrative tasks to our CA.
The difference between the step username and the admin provisioner is that step is the default admin account used to manage the CA itself — like creating provisioners — while homelab is the provisioner used to actually request and sign certificates.
The healthcheck in docker-compose.yaml is there to give Docker a clear indicator if the service is healthy. While I could leave it out, I prefer to include it so I can monitor the status via docker ps.
We bind port 9000 to localhost to allow bootstrapping of our CA and to manage it easily.
With the config done, it’s time to bring the Smallstep container up using docker compose up -d, and use docker compose logs -f to get the automatically generated password
Setup Smallstep CA
With smallstep running, let’s bootstrap this CA on your VPS. Bootstrapping allows management of the Smallstep CA from this local system and installs the newly minted root certificate to the OS trust store.
CA_FINGERPRINT=$(docker run -v /containers/smallstep/data:/home/step smallstep/step-ca step certificate fingerprint /home/step/certs/root_ca.crt)
step ca bootstrap --ca-url https://127.0.0.1:9000 --fingerprint $CA_FINGERPRINT --install
Now whenever your computer tries to communicate with this Smallstep instance, it will be trusted because the step client can validate the certificate using the installed CA in our trust store. Below is an example output from a previous instance I had running
The root certificate has been saved in /home/ubuntu/.step/certs/root_ca.crt.

The authority configuration has been saved in /home/ubuntu/.step/config/defaults.json.

Installing the root certificate in the system truststore... done.
Initialize ACME
The Automatic Certificate Management Environment (ACME) protocol is what’s used by Lets Encrypt to issue a domain you control a certificate. In essence, it is signs the certificate request IF you can prove you control the domain name. Use this if you want to use traefik or certbot to generate and manage certificates for domains you control.
From the local system, create a new ACME provisioner with a maximum of 45 days cert lifetime, instead of the default 24 hours, as follows
step ca provisioner add vps --type ACME -x509-default-dur=1080h -x509-min-dur=5m -x509-max-dur=1080h
Here, I am creating a new provisioner named vps and I have set the default duration to 45 days (1080 hours) so all my certs that are created using default values will have a certificate with 45 days validity. The minimum duration indicates what is the lowest duration certificate that can be created, in this case 5 minutes. For the max, it is also set to 45 days. I chose 45 days due to a policy coming into effect after 15 March 2029, which limits all newly issued certificates to a maximum validity of 47 days.
When prompted for password, enter the username step and generated password during CA initialization.
If there is a need to update this provisioner at a later date, run the following command
step ca provisioner update vps -x509-default-dur=1080h -x509-min-dur=5m -x509-max-dur=1080h
Initialize JWK
This approach is used to generate server certificate and key to be used for services that cannot use the ACME protocol as above, such as postgres TLS or for generating mTLS certificates. You can obtain a valid certificate for your services using this approach without needing to listen on port 80 for an ACME challenge response before the certificate is generated.
From the local system, create a new JWK provisioner with a maximum of 45 days cert lifetime, instead of the default 24 hours, as follows
step ca provisioner add service --type JWK --create -x509-default-dur=1080h -x509-min-dur=5m -x509-max-dur=1080h
Here, I am creating a new provisioner named service with a certificate validity of 45 days. The explanation is the same as above for ACME. Notice the --create flag which creates a new private key for this provisioner. step will prompt for a password to encrypt this key, you can either let step generate a random password or you can provide a password of your choosing.
Following this, when prompted for password, enter the username step and generated password during CA initialization.
Generating certificate using JWK
To generate a certificate using the JWK approach, ensure it is done on a local system that has been bootstrapped. We need this to communicate with our Smallstep instance to do the certificate signing and renewal.
step-cli ca certificate --provisioner service --san ${san1} --san ${san2} --not-after=1080h ${domain} ${base_dir}/server.crt ${base_dir}/server.key
Here, we are explicitly defining the provisioner service to sign our certificate using the SAN and domain name, and storing the output certificate and key into a location of our choice.
Renewing certificate
To renew a certificate, I use the following systemd service file to renew certificates for my servives that do not use traefik
$HOME/.config/systemd/user/renew-cert.service
[Unit]
Description=Certificate renewer for service
After=network-online.target
Documentation=https://smallstep.com/docs/step-ca/certificate-authority-server-production
StartLimitIntervalSec=0

[Service]
Type=oneshot

Environment=STEPPATH=/home/user/.step \
            CERT_LOCATION=/containers/mailpit/data/server.crt \
            KEY_LOCATION=/containers/mailpit/data/server.key \
            CONTAINER_NAME=mailpit

; ExecCondition checks if the certificate is ready for renewal,
; based on the exit status of the command.
ExecCondition=/usr/bin/step-cli certificate needs-renewal ${CERT_LOCATION} --expires-in 75%

; ExecStart renews the certificate, if ExecStartPre was successful.
ExecStart=/usr/bin/step-cli ca renew --exec "docker restart ${CONTAINER_NAME}" --force ${CERT_LOCATION} ${KEY_LOCATION}

[Install]
WantedBy=default.target
$HOME/.config/systemd/user/renew-cert.timer
[Unit]
Description=Run certificate renewal check at scheduled time
Requires=renew-cert.service

[Timer]
Unit=renew-cert.service
OnCalendar=Sat *-*-* 01:00:00

[Install]
WantedBy=timers.target
Replace /home/user with your own username and update the location of your container accordingly. I have configured the service to check if the certificate is nearing expiry if its within 75% of the expiry time, which is the recommended timeframe for certificate renewal by Lets Encrypt.
Start and enable the timer using the following command
systemctl --user enable renew-cert.timer
systemctl --user start renew-cert.timer
This guide specifically focuses on using Smallstep as a TLS certificate issuer. It can also be used to issue SSH certificates, which I might cover in a future post.
With the earlier tasks done, we can proceed to Part 4 of the guide, the final part in this series, where we set up the Caddy reverse proxy.